How to position controls using Canvas control in WPF using MVVM
The best way to position different controls using Canvas in MVVM is using ItemsControl.We need to bind ItemsControl with the list of controls and using Canvas control as the ItemsTemplate.Lets understand it in more details using an example.
Step 1: Add an ItemsControl in MainWindow.
Step 2: Lets create a list containing the different heights, width,top and left poistions for the controls and this list we will be using as the ItemsSource to bind the ItemsControl.
Step 3: Lets Create a class under ViewModel folder only named as “ControlDetails”, Class should look like:
namespace WpfApplication1.ViewModel
{
public class ControlDetails
{
public double Height
{
get;
set;
}
public double Width
{
get;
set;
}
public double Top
{
get;
set;
}
public double Left
{
get;
set;
}
}
}
Step 4: Lets go to the MainWindowViewModel and add the records into the ControlDetailsList to bind the ItemControl and to define the position of controls.
public void AddControlPositionToList()
{
controlDetailsList = new List<ControlDetails>();
ControlDetails controlDetails = new ControlDetails();
controlDetails.Height = 100;
controlDetails.Width = 200;
controlDetails.Left = 164;
controlDetails.Top = 86;
controlDetailsList.Add(controlDetails);
controlDetails = new ControlDetails();
controlDetails.Height = 200;
controlDetails.Width = 300;
controlDetails.Left = 349;
controlDetails.Top = 100;
controlDetailsList.Add(controlDetails);
controlDetails = new ControlDetails();
controlDetails.Height = 300;
controlDetails.Width = 400;
controlDetails.Left = 558;
controlDetails.Top = 40;
controlDetailsList.Add(controlDetails);
controlDetails = new ControlDetails();
controlDetails.Height = 400;
controlDetails.Width = 500;
controlDetails.Left = 733;
controlDetails.Top = 40;
controlDetailsList.Add(controlDetails);
}
So in above records we have defined the Height and width of the controls and Top and left margins or positions of the controls.
Step 5: Lets call this list in the IntitializeCollections or constructor where ever you want to bind the Itemcontrol.
public override void IntitializeCollections()// you can use constructor here to call this method.
{
AddControlPositionToList();
}
Step 6: Now, we need to move to the MainWindow.xaml and bind the ItemControl to the above defined list and bind the positions of the controls using Canvas. So our ItemControl should look like below xaml:
<ItemsControl ItemsSource="{Binding controlDetailsList}">
<ItemsControl.ItemsPanel>
<ItemsPanelTemplate>
<Canvas IsItemsHost="True"/>
</ItemsPanelTemplate>
</ItemsControl.ItemsPanel>
<ItemsControl.ItemContainerStyle>
<Style TargetType="FrameworkElement">
<Setter Property="Canvas.Left" Value="{Binding Path=Left}"/>
<Setter Property="Canvas.Top" Value="{Binding Path=Top}"/>
<Setter Property="Canvas.Width" Value="{Binding Path=Width}"/>
<Setter Property="Canvas.Height" Value="{Binding Path=Height}"/>
</Style>
</ItemsControl.ItemContainerStyle>
<ItemsControl.ItemTemplate>
<DataTemplate>
<Border BorderBrush="Black" BorderThickness="2">
<TextBox Text="abc"/>
</Border>
</DataTemplate>
</ItemsControl.ItemTemplate>
</ItemsControl>
ItemSource should be the list to which we need to bind item control.
ItemPanelTemplate should be the Canvas.
Then In the style bind the Canvas positions with the positions defined for control i.e. Left,Top,Height,Width.
Now, in DataTemplate we just need to define the control that we need to position, I have used TextBox with Border.
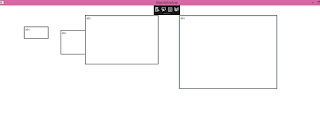
As we have 4 records in the list, 4 textboxes should get displayed in different poisiotns.
Thats all, now we are ready to run the application and see the results.
Result:
 In our next article we will learn how to resize and reposition thecontrols using canvas and save those dimensions.
Thank you!!
Step 1: Add an ItemsControl in MainWindow.
Step 2: Lets create a list containing the different heights, width,top and left poistions for the controls and this list we will be using as the ItemsSource to bind the ItemsControl.
Step 3: Lets Create a class under ViewModel folder only named as “ControlDetails”, Class should look like:
namespace WpfApplication1.ViewModel
{
public class ControlDetails
{
public double Height
{
get;
set;
}
public double Width
{
get;
set;
}
public double Top
{
get;
set;
}
public double Left
{
get;
set;
}
}
}
Step 4: Lets go to the MainWindowViewModel and add the records into the ControlDetailsList to bind the ItemControl and to define the position of controls.
public void AddControlPositionToList()
{
controlDetailsList = new List<ControlDetails>();
ControlDetails controlDetails = new ControlDetails();
controlDetails.Height = 100;
controlDetails.Width = 200;
controlDetails.Left = 164;
controlDetails.Top = 86;
controlDetailsList.Add(controlDetails);
controlDetails = new ControlDetails();
controlDetails.Height = 200;
controlDetails.Width = 300;
controlDetails.Left = 349;
controlDetails.Top = 100;
controlDetailsList.Add(controlDetails);
controlDetails = new ControlDetails();
controlDetails.Height = 300;
controlDetails.Width = 400;
controlDetails.Left = 558;
controlDetails.Top = 40;
controlDetailsList.Add(controlDetails);
controlDetails = new ControlDetails();
controlDetails.Height = 400;
controlDetails.Width = 500;
controlDetails.Left = 733;
controlDetails.Top = 40;
controlDetailsList.Add(controlDetails);
}
So in above records we have defined the Height and width of the controls and Top and left margins or positions of the controls.
Step 5: Lets call this list in the IntitializeCollections or constructor where ever you want to bind the Itemcontrol.
public override void IntitializeCollections()// you can use constructor here to call this method.
{
AddControlPositionToList();
}
Step 6: Now, we need to move to the MainWindow.xaml and bind the ItemControl to the above defined list and bind the positions of the controls using Canvas. So our ItemControl should look like below xaml:
<ItemsControl ItemsSource="{Binding controlDetailsList}">
<ItemsControl.ItemsPanel>
<ItemsPanelTemplate>
<Canvas IsItemsHost="True"/>
</ItemsPanelTemplate>
</ItemsControl.ItemsPanel>
<ItemsControl.ItemContainerStyle>
<Style TargetType="FrameworkElement">
<Setter Property="Canvas.Left" Value="{Binding Path=Left}"/>
<Setter Property="Canvas.Top" Value="{Binding Path=Top}"/>
<Setter Property="Canvas.Width" Value="{Binding Path=Width}"/>
<Setter Property="Canvas.Height" Value="{Binding Path=Height}"/>
</Style>
</ItemsControl.ItemContainerStyle>
<ItemsControl.ItemTemplate>
<DataTemplate>
<Border BorderBrush="Black" BorderThickness="2">
<TextBox Text="abc"/>
</Border>
</DataTemplate>
</ItemsControl.ItemTemplate>
</ItemsControl>
ItemSource should be the list to which we need to bind item control.
ItemPanelTemplate should be the Canvas.
Then In the style bind the Canvas positions with the positions defined for control i.e. Left,Top,Height,Width.
Now, in DataTemplate we just need to define the control that we need to position, I have used TextBox with Border.
As we have 4 records in the list, 4 textboxes should get displayed in different poisiotns.
Thats all, now we are ready to run the application and see the results.
Result:

Thank you!!

Comments
Post a Comment